
Let’s be honest. When we think about app accessibility, voiceover for the visually impaired often takes center stage. But there’s a whole spectrum of need out there. For users with motor impairments—which can stem from cerebral palsy, ALS, Parkinson’s, spinal cord injuries, or simply the natural effects of aging—touching a tiny, precise target on a glass screen isn’t just difficult. It can be utterly impossible.
That’s the gap we’re bridging today. Building accessible iOS apps for users with motor impairments isn’t about charity or checking a compliance box. It’s about dignity, independence, and frankly, good design. When you design for these users, you often create a smoother, more thoughtful experience for everyone. It’s like building a ramp alongside stairs—useful for wheelchair users, sure, but also for someone with a stroller or a delivery cart.
It Starts with the Foundation: iOS Built-in Features
Here’s the deal: Apple has done a ton of the heavy lifting for you. Your first, and most crucial, step is to ensure your app plays nicely with these system-level tools. Think of them as the assistive infrastructure you get for free.
Switch Control: The Game Changer
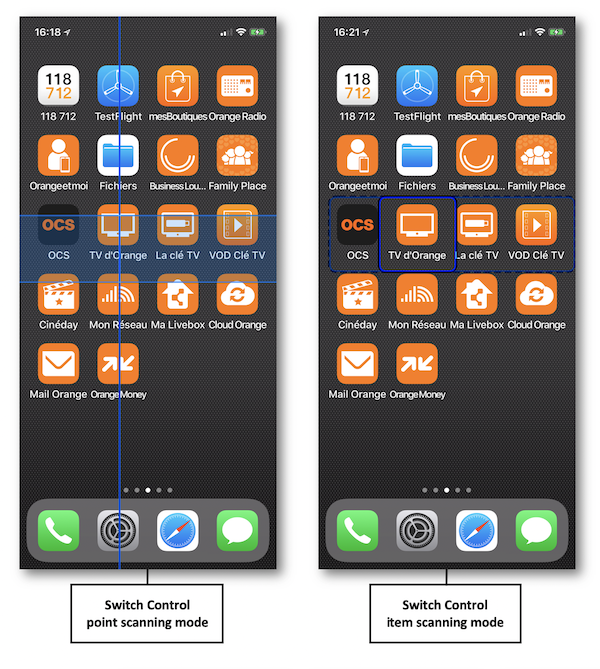
For users with limited mobility, Switch Control is nothing short of revolutionary. It allows someone to navigate their iPhone or iPad using a single switch—a button, a puff sensor, a head movement, you name it. The interface scans through interactive elements on screen, and the user activates their switch to select.
Your job? Make sure every single tappable element is properly exposed to this scanning system. If a custom button isn’t marked up correctly, it becomes an invisible island, trapping the user. That means using standard UIKit/SwiftUI controls whenever possible and always, always setting proper accessibility traits and labels.
Voice Control: “Tap Send”
With Voice Control, users navigate entirely by speaking commands. They might say “Show numbers” to overlay digits on every interactive element, then say “Tap 12” to activate it. For this to work seamlessly, your app’s elements need unique, logical labels. If two buttons are both just labeled “Button” by the system, voice control fails. It’s like having two doors in a hallway both marked “Door”—which one do you open?
Designing for Touch: Size, Spacing, and Timing
Okay, beyond system features, your design choices make a world of difference. Motor impairments can mean tremors, reduced fine motor control, or using a mouth-held stylus. Precision is the enemy.
Hit Targets are Sacred. Apple’s Human Interface Guidelines recommend a minimum touch target of 44×44 points. Honestly? For motor accessibility, go bigger. Aim for 60×60 where you can. And increase spacing between interactive elements—crowded buttons are a minefield for accidental taps.
Then there’s timing. Gestures like double-tap or long-press can be incredibly difficult. Always provide a simple, single-tap alternative. And be generous with timeouts—that “press and hold for 3 seconds to edit” might need to be adjustable, or simply longer.
The Code: Practical Implementation Tips
Let’s get into the weeds a bit. Here are some concrete, actionable strategies for your development process.
1. Beyond the Default: Customizing Accessibility
Sometimes, the default accessibility behavior isn’t enough. Say you have a custom drawing view. You can make it accessible to Switch Control by overriding accessibilityElementCount() and accessibilityElement(at:) to create virtual “buttons” for different actions like “undo” or “change color.” It’s about creatively mapping custom interactions back to the assistive framework.
2. Managing Focus Like a Pro
For switch and voice control users, focus is everything. You must manage the accessibilityElement order logically—usually top-to-bottom, left-to-right. When a modal appears, focus must move inside it immediately. And when an action is completed (like saving a document), provide clear auditory and focus feedback. A simple UIAccessibility.post(.announcement, argument: "File saved successfully") can orient the user completely.
3. Supporting Alternative Input Devices
Many users connect external adaptive switches, joysticks, or trackballs via Bluetooth. These devices often work through Switch Control, but also consider direct keyboard navigation. Ensure your app supports the UIFocusEngine and full keyboard navigation. Tab order should be logical, and all interactive elements should be reachable.
Testing: You Can’t Wing This
You can’t guess at this experience. You have to test it. And I don’t just mean turning on VoiceOver.
Enable Switch Control in your device’s Settings under Accessibility. Try to use your own app with a single switch (you can use the screen as a switch). It’s humbling. You’ll instantly find the flaws—the hidden button, the endless scanning loop, the action that requires a magic swipe.
Better yet, involve real users with motor impairments in your testing cycle. Their feedback is the ultimate guide. It’s the difference between a theoretically accessible app and one that genuinely empowers.
A Quick Checklist for Your Next Build
To keep it simple, here’s a mental checklist to run through:
- Large, spaced touch targets: Bigger than 44pt. Please.
- Logical focus order: Does the focus flow where the eye would go?
- Gesture alternatives: Can every function be achieved with a single tap?
- Clear labels: For buttons, for Voice Control, for everything. “Add” is better than “Plus icon.”
- System feature harmony: Does it work with Switch Control, Voice Control, and AssistiveTouch?
- Timing forgiveness: Are your timeouts and gesture durations adjustable or generous?
Look, building accessible iOS apps for motor impairments requires a shift in perspective. You’re not just coding for fingers. You’re coding for switches, for voice, for alternative inputs. You’re building digital ramps and automatic doors.
And in the end, that effort doesn’t just open your app to more users. It quietly, profoundly, declares that they belong there. That their experience matters. In a world that can feel increasingly digital and exclusive, that’s a powerful statement to make—one thoughtful line of code at a time.


More Stories
iOS Security Vulnerabilities and How to Mitigate Them: Your Practical Guide
iOS Home Screen Customization Trends Beyond Widgets
iOS Gaming Performance Tips for Competitive Players